In this article, we will be explaining one of the sample project “Reimbursement” done using Canvas app and SharePoint List. However, before diving into that, let’s first provide a quick overview of the power platform, apps, and canvas app.
What is a Power Platform?
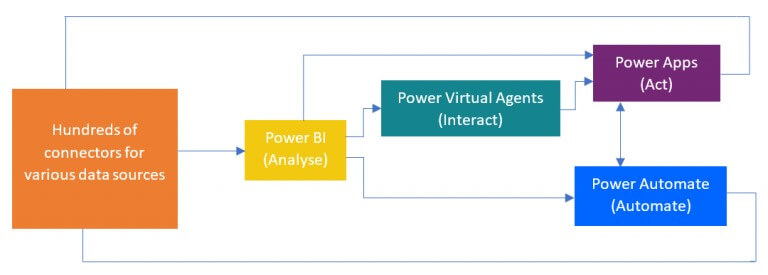
The Power Platform is a combination of four Microsoft products: Power BI, Power Automate, Power Apps, and Power Virtual Agents, and it’s quite intriguing. The Power Platform strives to provide you with the ability to create unique apps that meet your specific business requirements. The most foundational data source – Common Data Service for your data – provides secure and cloud-based storage. You can create bespoke apps to connect to data stored in the Common Data Service or any other online or on-premise data source. SharePoint developers have access to data from Office 365, Dynamics 365, third-party apps, and other Microsoft SharePoint development services.
What Is PowerApps?
Power Apps is a suite of apps, services, connectors, and data platforms. It provides an extensive application development environment to build apps as per your business needs. Apps built using Power Apps have a responsive design and seamlessly run on the browser as well as on mobile – tablet devices.

What is a Canvas App?
To fabricate the user interface and experience in your desired way, the Canvas app entertains that liberty for you. You can set the look and feel of apps the way you want it. You can link over 200 connectors and 100 templates in your app. Canvas apps can be created for the web, mobile, and tablet applications.
You can drag and drop elements that you require to create your canvas app. You can pull data from multiple data sources and combine it into one app.
To get started building your app, you can choose to approach it in one of the following ways:
From a SharePoint list
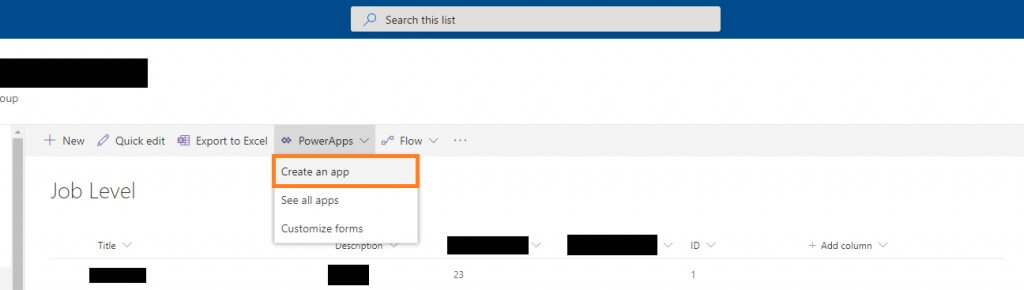
From a Power BI dashboard
Sample Project: Reimbursement App
In this article, we’ll go over one of the sample projects, the “Reimbursement Project,” which was created with the Canvas app and a SharePoint List. This application, as the name implies, will be used by employees to create reimbursement claims for various projects, which will be monitored and controlled by the manager and accounts. The employee’s application can be approved or rejected by the manager and the accounts section.
Employees can also keep track of all the requests they’ve submitted in the past, and if they’re still waiting, they can remove or alter them. Employees cannot delete or edit applications once they have been approved or rejected.
Managers and Accountants, like employees, can keep track of all supplied records at any time. The Accounts section now includes a tool that allows you to download all or specific records to an Excel sheet in .CSV format.
It has a number of characteristics and functions, including the following:
• An Approval mechanism with many levels of approval.
• Data concealment and security
• Date filter, Status filter, Location filter, and Employee search are all record filters.
• The Accounts component can convert records to.CSV format.
• Dynamic UI with a simple UI Greetings and welcome.

Preparations:
We must first arrange a few things before we can begin using our canvas software. We’ll use SHAREPOINT as our data source.
Preparing a SharePoint site consists of the following steps:
1. On the SharePoint start page, select + Create site.
2. Choose whether you want to establish a Team site or a Communication site in the wizard. Select a sensitivity level for your site’s data. Choose whether the group will be open to the public or kept secret. After that, choose a default language for your site and click Next.
3. Fill in the owners and members in the next pane.
4. Click the Finish button.
Getting started with our Canvas App:
To make a new Canvas app, follow these steps:
1. Open Power Apps and log in.
2. Select Canvas app from the blank list under Make your own app.
3. Give your app a name, choose Phone, and then click Create.
You may create an app from the ground up for phones or other devices (such as tablets). This article focuses on creating a mobile app.
Power Apps Studio generates a mobile app from scratch.
4. Select Skip if the Welcome to Power Apps Studio dialogue box appears.
Connectors to use:
We’ll use a variety of connectors here, including:
• Office365Users: To retrieve user information.
• Office365Outlook: This programme is used to send emails.
• Data source: SharePoint.
• Power Automate: For creating flows and integrating them into PowerApps.
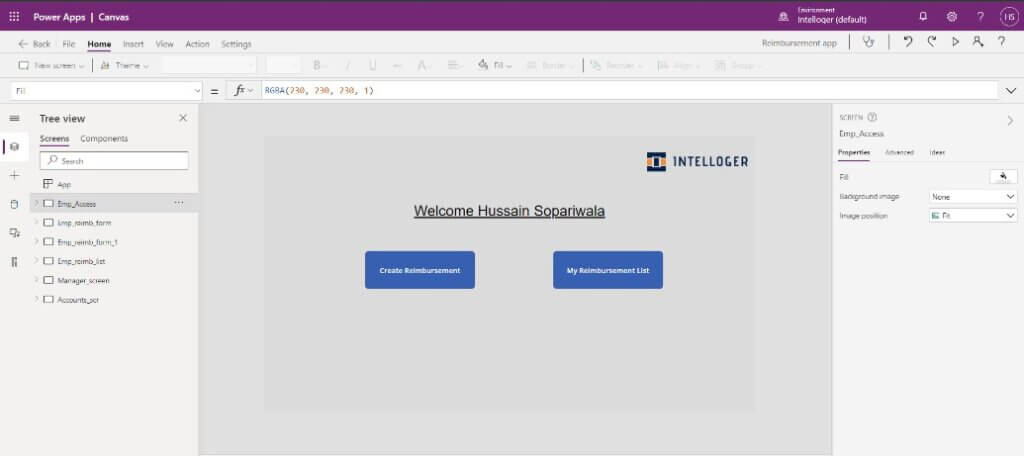
Preparing a welcome screen for Employees:
The welcome screen for new employees should be simple but appealing. It shouldn’t be difficult to understand, and the user interface should be straightforward and attractive.
The welcome screen has two key components:
1.The logged-in User Name appears in the welcome message.
2.Buttons that allow users to move from one screen to the next.
Dynamic Welcome Greetings:
The user’s name should be displayed in the greeting, which is dynamically logged in. We’re going to use a function named USER in this case (). We may get the current logged in user’s name, email, and other information with this function. We can use that to make dynamic code like this:

Navigate Buttons:
On the Employee welcome screen, there are two buttons.
1. Bring Employee to the form creation screen first.
2. Next, Employee will be directed to a list of all previously filed applications.
To make the buttons, follow these steps:
• Choose INSERT • Choose Button
After you’ve selected and added a button to the screen, double-click it to rename it. Now, navigate to the ON SELECT property and write the following code:
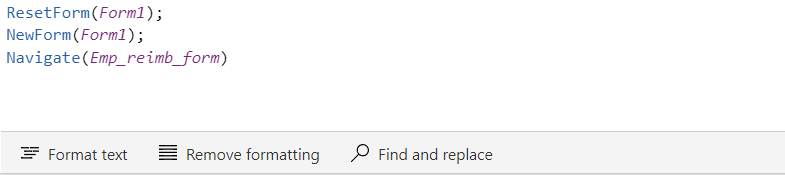
Here, ResetForm() will reset the previously created form & NewForm will create a new form. Navigate() will take us to the form submitting screen.
Same for the MY LIST button, the code is simple and easy as:
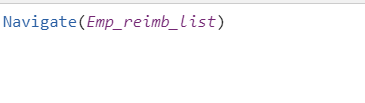
Here, ResetForm() will reset the previously created form & NewForm will create a new form. Navigate() will take us to the form submitting screen.
Same for the MY LIST button, the code is simple and easy as:
Preparing Form screen for Employee:
Steps to create a form screen:
- Select a scrollable screen.
- Then select Forms option.
- Select Edit forms.
- Then select the data source, if it is not available directly, then select Add Data & select the SharePoint, and select the link.
- Modify the SharePoint contents according to the needs.
These are the Form settings-
The screen has 2 sections, Datacard1 & Datacard2. Datacard1 has a form in it. While Datacard2 will be used to hold the Submit and Cancel button. At the end, the screen will look like:
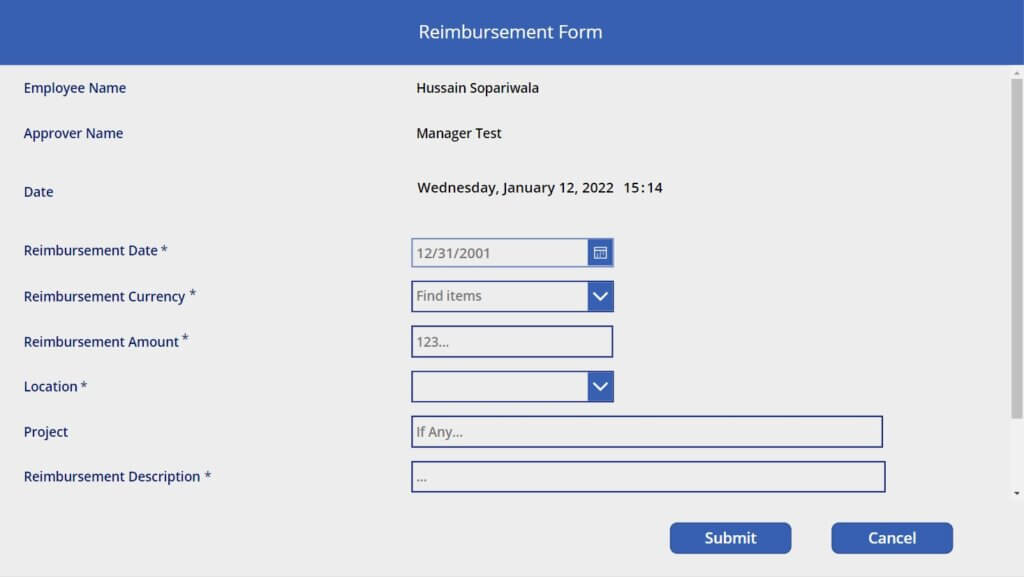
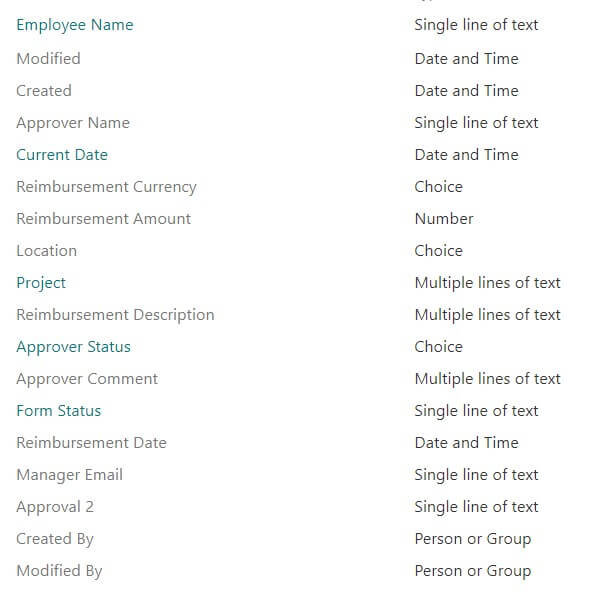
In the form 3 fields are dynamic, Employee Name, Approver’s Name and Date. These fields should be automatically detected by the system.
- Code for the Employee’s Name:

- Code for Today’s Date:

- Code for Approver’s Name:

In the Employee’s name and Today’s Date, the IF() condition is used so that the system couldn’t replace the name and date with the name of Manager and date of approval/rejected when it is used by the Manager in Edit Mode.
In this form, we have 2 more options that is Approver’s Status and Approver’s comments. It should only be visible when the logged in user is manager or we can say when the submitted form is being edited by the manager. So in its Visible property, we’ll use a simple code as:
User().email=[email protected](this is hard-coded) Or we can pass the reference of the SharePoint site where all the names and emails of the manager are being stored.
The 2 buttons in the Datacard2 section, Submit and Cancel have a simple code. When the submit is pressed, it’ll submit the form and the code is:
SubmitForm(form-name)
As for the cancel button, it’ll take us to the employee list:
Navigate(Employee_list)
When the form is submitted, we have several actions to perform:
- Notify the employee that it has been submitted successfully.
- Notify the Manager and accounts that form is submitted.
- Navigate to the Employee List screen.
So in order to achieve that, we’ll first select the form > Select ON SUCCESS property and then we’ll use this type of code:
Employee List Screen:
In this screen we’ll have all the submitted forms by the user. From here, the user will be able to see the status of the submitted form, can also Edit or Delete the form if and only if the form is in the Pending state, if the form is approved or rejected, the user will be only able to view the form. It is quite simple and easy to create.
Steps in order to create Employee List Screen:
- Select new screen, i.e. Scrollable screen from the NEW SCREEN option.
- Select the INSERT option.
- Now select the GALLERY option and select blank vertical gallery.
- Use SharePoint as the Data source.
- Start adding labels to the gallery by selecting the label option.
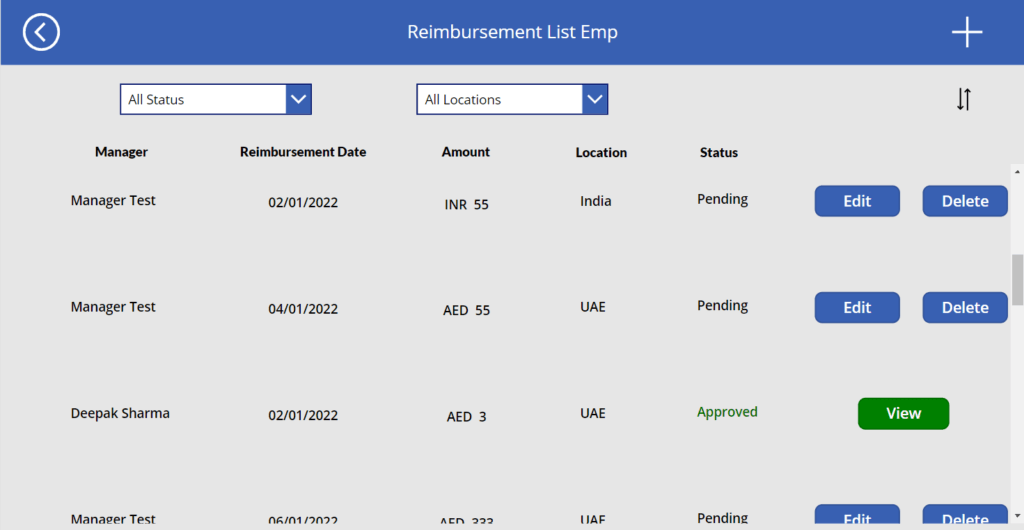
As displayed in the above picture, the form with the approved or rejected status is displaying the option of only VIEW & the form with the pending status is showing the option of Edit and Delete.
This can be achieved by the following:
Insert 2 buttons from the button option in the gallery, and rename it as Edit & Delete. Both the Edit & Delete button have simple coding. In order to achieve the edit form, we’ll use simple formula in the ONSELECT property of buttons as:

Here, form1 is the name of the form used. In the Navigate function, a variable is created named sss, now we have to pass this same variable to the ITEM section of the form1. Edit button is ready.
As for the delete button,

Gallery3 is the name of the blank vertical gallery we used to display the reimbursement forms data.
We have also created some filters here. One is Location filter and Second is Form Status filter. There is also Date filter, which will display the data according to the date of submission in ascending/descending order.
For the dropdown filters, First put some code in the ONVISIBLE section of the SCREEN like:

This will create a collection and fetch data from there to display in the gallery.
As for the Date filter, we will use SortByColumns functions.
Now to connect the collection with the gallery, inside the ITEMS property on the gallery, we’ll use codes like:

Now we want that Edit and Delete button should only be visible is Form status is Pending, so in the VISIBLE property of the buttons, we’ll use this codes:

As for the VIEW button, the TRUE & FALSE will change it’s positions. The rest of the formula will remain same.
In ONSELECT property of the VIEW button, we’ll use simple NAVIGATE() function.
For the color of the VIEW button, inside the FILL property on button, put code like:

Preparing Manager Screen:
The concept of this screen is same as Employee List Screen. There are some minor & obvious changes in this screen. Manager will only be able to Approve or Reject the form and won’t be able to Edit or Delete the contents of the form.
So this Screen will only have View button and not Edit & Delete.
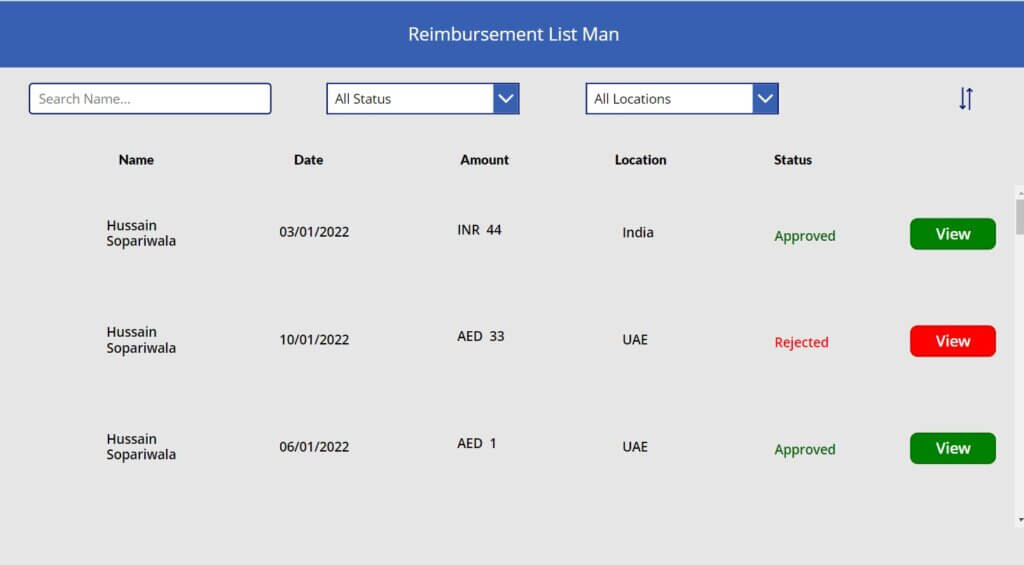
The reimbursement form has 2 fields, Approver Status & Approver’s Comments. Both fields are REQUIRED and should only be visible to the MANAGER and not to employees or accounts.
So in their VISIBLE property, we’ll use the code like:
User().email=manager@…, code can be modified according to the needs.
So when the manager will use the VIEW button, it’ll take him to the edit form and from there he can edit the Status & Comment field. Manager Screen also has search field as well, so that he can search for the particular employee.
Now here comes a tricky concept. Once the manager approves or rejects the form, he shouldn’t be able to change the status again.
So inside the DISPLAYMODE property of the Approver status & comment, we’ll use something like:
IF(ThisItem.approverStatus.Value=Pending,Displaymode.Edit,DisplayMode.View)
Now when the status is pending, it’ll allow manager to make changes inside Status and Comments, once submitted and status changes, it’ll go into View mode and after that manager won’t be able to make changes.
Preparing the Accounts Screen:
The basics of the Accounts Screen is same as Employee and Manager Screen. Accounts should be able to view the forms, but can’t make any changes to it. Accounts should be able to download the form in .CSV format in the Excel. This is the only major change that Accounts screen has.
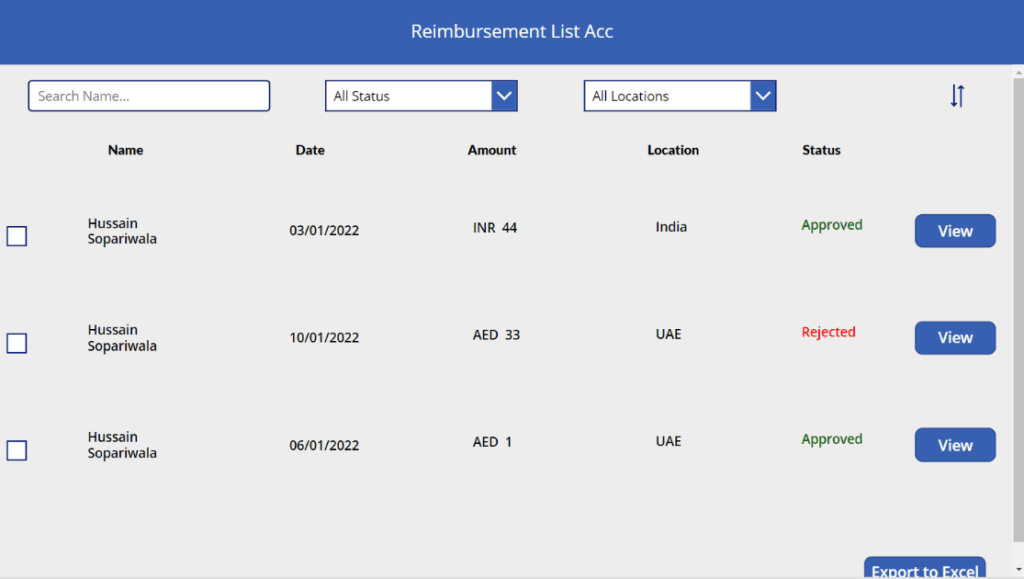
So in order to achieve this, we’ll use the POWER AUTOMATE. But first, the concept:
There should be a button which on select should download all the submitted forms to excel. There should be checkbox which when select should mark the form and after that, when the button is selected, it should only download the checked forms and not all of the forms.
In the ONVISIBLE property of the screen, we’ll first create a collection using ClearCollect() function and it’s initial value will be set as Blank. Then inside the ONCHECK property of the Checkbox,

ONUNCHECK property,

Here Yes is the name of blank collection we created earlier inside ONVISIBLE of the screen.
In the ONSELECT property of the Export-to-Excel button, coding will be like:

In order to connect power automate to the button, first select the button, the go to the ACTION and select power automate, then select create new.
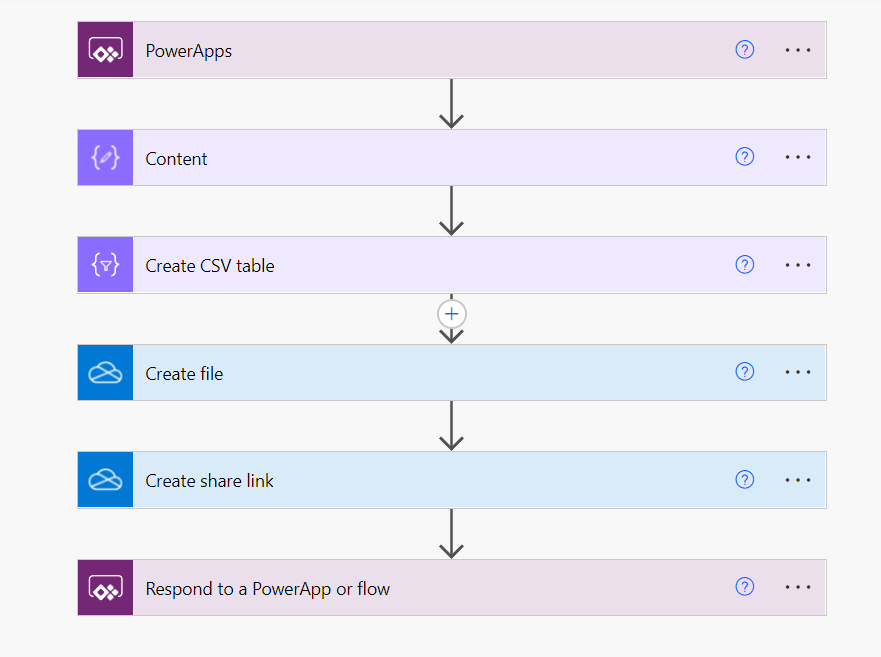
Using this flow we can convert reimbursement data to .CSV format.
Multi-Level Approval Flow:
Concept: Multi-level approval is used to verify the given data by multiple people or groups step by step, if first stage approves, form goes to the second stage and so on. At the end the decisions of every step determine the final status of the form.
It is essential in our application because it will be forwarded to different approvers. All these approvers are expected to understand what is expected of them, review the document, and approve it when it meets the necessary criteria. At surface level, the idea of splitting up a base process into multiple stages may sound simple but the concept is capable of bringing about a digital revolution in workflow management.
We have used this concept in this reimbursement form using Power Automate like:

Here we have provided all the necessary conditions for the loop to work. We have used several functions like update item, send emails via office 365, start & wait for approvals e.t.c. Once we connect our SharePoint list with this flow by providing the site address and list address, it’ll then automatically detect the new or modified forms and work accordingly.
Conclusion:
Our project makes the work easy and simple both for the Manager/Accounts & for the Employees. One app has all the information about all the reimbursement forms & it is easy to track all the previously submitted applications as well. Employee can easily submit & approvers can easily approve, no hustle needed. With simple UI, anyone can understand the process of submission and with the Power automation, the backend is quite powerful.
About Intelloger
At Intelloger we always aim to provide you with solutions that can help you solve the most complicated problems you face while managing your business. From Oracle solutions to digital transformation, IoT and much more, we make it easier for you, just as we made this solution easy to understand and adapt.
About Author
Hussain Sopariwala is a software developer at Intelloger,working on the Power Platform and creating a range of applications using Power Platform features such as Power Apps, Power Automate, and Power BI.You can reach him at [email protected]