
1. Introduction
If your organization deals with a large volume of documents, you know how challenging it can be to manage them effectively. This is where the ‘Document Approval System’ app comes in.
This Document Approval system is a game-changer for anyone who needs to manage and approve documents in their organization.
With this app, you can say goodbye to the hassle of a traditional document approval system and enjoy a seamless, efficient process that improves workflow and saves time.
Whether you’re an Employee submitting a document, an Approver reviewing it, or a Notifier overseeing the process, the ‘Document Approval System’ has got you covered. With this comprehensive system, all the necessary steps are taken to get your documents approved quickly and efficiently.
2. Problem with Traditional Document Approval Method
Traditional document approval systems can be tedious, error-prone, and time-consuming. Manual document workflows often rely on paper-based processes, which can be difficult to track, leading to miscommunication and lost documents.
Additionally, traditional document approval systems can be costly to implement and maintain, requiring physical storage space and dedicated IT personnel to manage the system.
As businesses grow, document approval systems can become complex. However, adopting modern solutions with advanced collaboration tools can streamline workflows and make the process more efficient.
In organizations with multiple departments or different designations, tracking document approval using traditional methods can be a challenging task. Moreover, creating custom approval workflows can be complex and time-consuming. As a result, this may lead to delays in the approval processes, causing frustration for all parties involved.
These inefficiencies can lead to missed deadlines, poor communication, and ultimately, decreased productivity and revenue.
The ‘Document Approval Application’ solves these problems by providing a streamlined, digital solution that is easy to use and maintain, while providing real-time visibility into the document approval process.
3. Why does business need advanced Document Approval software?
In today’s fast-paced business environment, time is a precious commodity. That’s why the Document Approval software is so important. By simplifying the document submission and approval process, this software saves valuable time that can be better spent on other important tasks. In addition, the software offers a range of features and functionalities that help to streamline the approval process and make it more efficient, ultimately leading to faster turnaround times and greater productivity.
This app eliminates the need for manual document tracking and approval, making it easy to manage all your documents in one place. With this app, you can ensure that your document management process is efficient and effective, allowing you to focus on other important tasks.
The Document Approval Software facilitates the process of identifying the appropriate location of approvers of different departments & designations, resulting in greater efficiency and accuracy in document approval.
Our document management system is designed to simplify and enhance the document management process, thereby providing a user-friendly experience. Its features include simple document submission, the option to select approvers, and streamlined approval processes that ensure rapid and precise approvals.
This system saves time and reduces errors by providing employees with a user-friendly and intuitive interface for submitting documents and enabling approvers to easily review and approve them.
4. Transforming Document Approval with PowerApps Canvas Technology
Power Platform is a low-code development platform that allows businesses to quickly create custom applications, workflows, and chatbots without requiring extensive coding skills while providing a unified and cohesive solution across its components.
PowerApps Canvas was chosen as the front-end development platform for the Document Approval system due to its versatility, ease of use, and integration capabilities with other Microsoft services, such as Office 365 and SharePoint. In particular, the platform’s flexibility in customizing the user interface and its seamless connectivity with other Microsoft products made it an ideal choice for the project.
The choice of PowerApps as the front-end development platform has enabled the Document Approval System app to be rapidly developed, highly customizable, and easily integrated with other Microsoft services. As a result, a user-friendly and intuitive interface for employees to submit and approvers to review and approve documents has been achieved.
4.1 Data Source
- To store the data, we use SharePoint lists. PowerApps and Sharepoint List work very well together, and Sharepoint provides a very unique field called Attachment in the forms. With SharePoint’s built-in features, including version control and permissions management, documents are stored and managed in accordance with company policies, ensuring adherence to organizational standards.
- To gather all the information and data of the employees, we use the Office365 connector.
- To send local emails, use the Office365.outlook connector.
4.2. Workflow Automation
- The ‘Document Approval System’ relies on Microsoft Power Automate (formerly known as Microsoft Flow) to manage workflow processes, mailing, and integration with other business applications. Using this tool, the system can be configured to send an email notification to the next approver after an employee submits a document, prompting them to review it. Throughout each step of the workflow, both the submitter and notifier are kept informed of the progress via email, ensuring that everyone stays up-to-date and informed throughout the entire process.
- Power Automate is utilized to synchronize employee data with Office 365, simplifying the management and updating of employee information effortlessly.
4.3 Reporting and Dashboards
The ‘Document Approval System’ leverages Power BI to create interactive reports and dashboards. This feature provides users with the ability to gain insights into the documents that have been submitted, reviewed, and approved, as well as track the overall status of the document management process. With this tool, users can easily visualize and analyze the data, making it easier to identify trends and areas for improvement.
By using Power BI, custom reports that highlight key performance indicators (KPIs) and other important metrics can also be created, which can contribute to improving decision-making and providing a real-time view of the document management process.
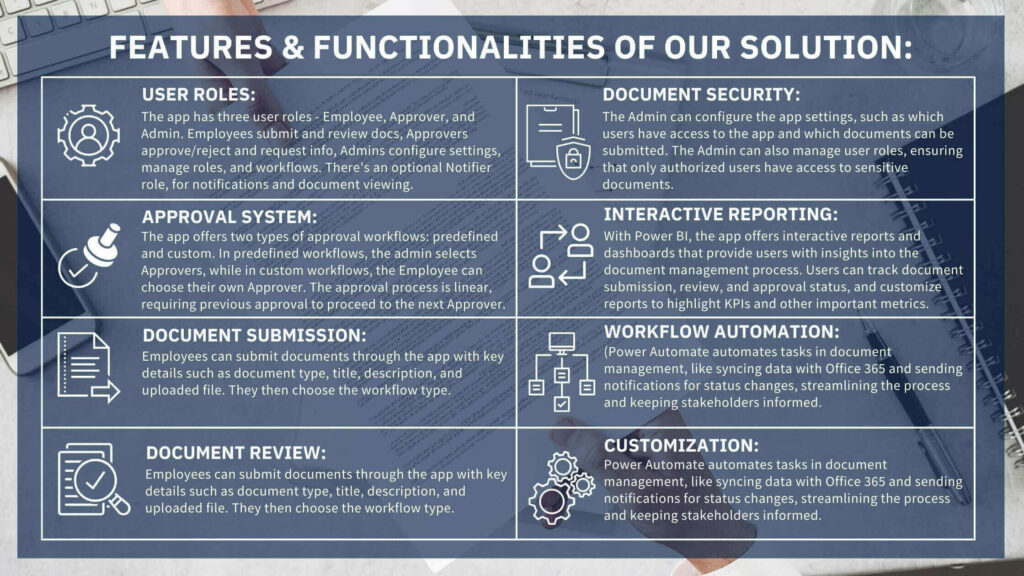
5. Features and Functionalities of Our Solution
Our “Document Approval System” simplifies document submission and approval with customizable features and an easy-to-use interface, replacing clunky and inefficient document management systems.
6. Functional Overview
Get a glimpse of the Document Management app’s features and functionality with this quick functional overview.
We designed the Document Approval System to cater to the needs of various user roles, including Admin, Employee, and Manager.
6.1 Admin Workflow
Let’s explore how the app functions when the logged-in user is an Admin.
After logging into the “Document Approval System”, administrators can effectively manage both the system and its users using a range of tools and features at their disposal.
Administrators have the ability to add, remove, or modify user accounts, define approval workflows, and configure the system to meet their specific needs. Furthermore, by utilizing Power BI’s detailed analytics and reporting tools, they can gain valuable insights into the system’s usage and document status. This feature provides a comprehensive overview of the system’s performance, which enables effective management and optimization.
When the user logs in, the ‘Home’ page will be selected by default.
A) To view the details of a particular field:
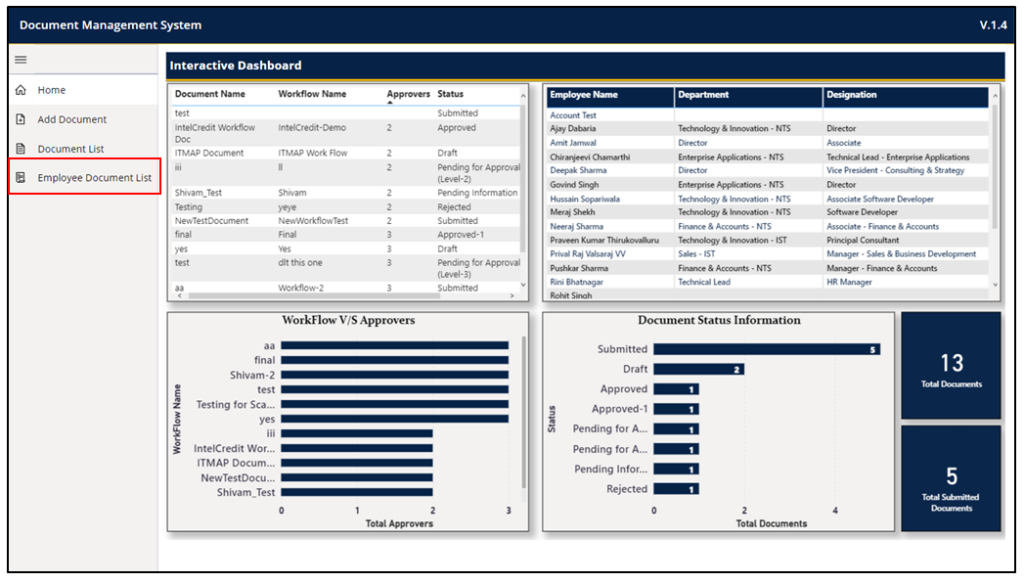
The interactive dashboard updates in real-time, allowing the admin to view the latest data by selecting any informative field.
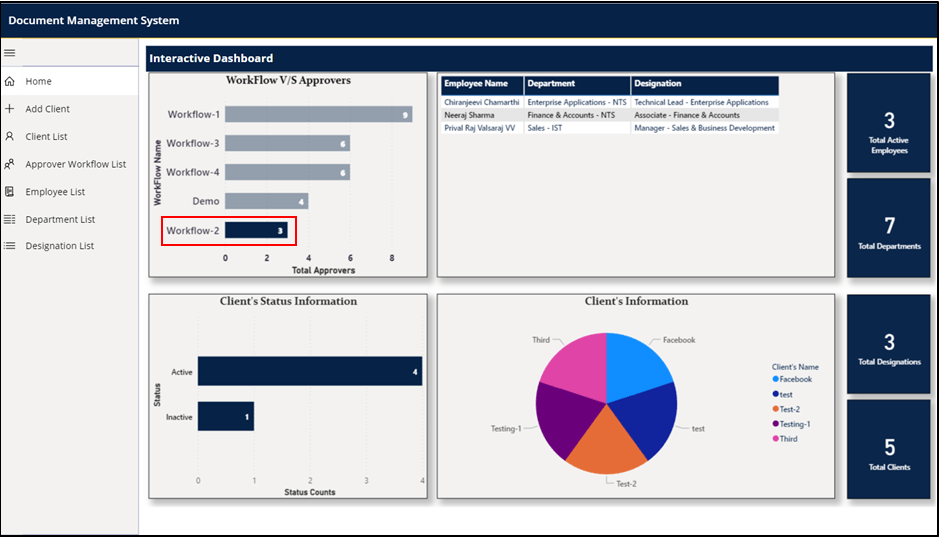
In the above dashboard, we selected ‘Workflow-2’ and received responses from all employees related to Workflow-2
B) To Add Client:
- ‘Add Client’ is the second option for Admin.
- When the admin selects that option, a new screen will appear with a form to fill up [Black Box] and submit [Light Blue Box].
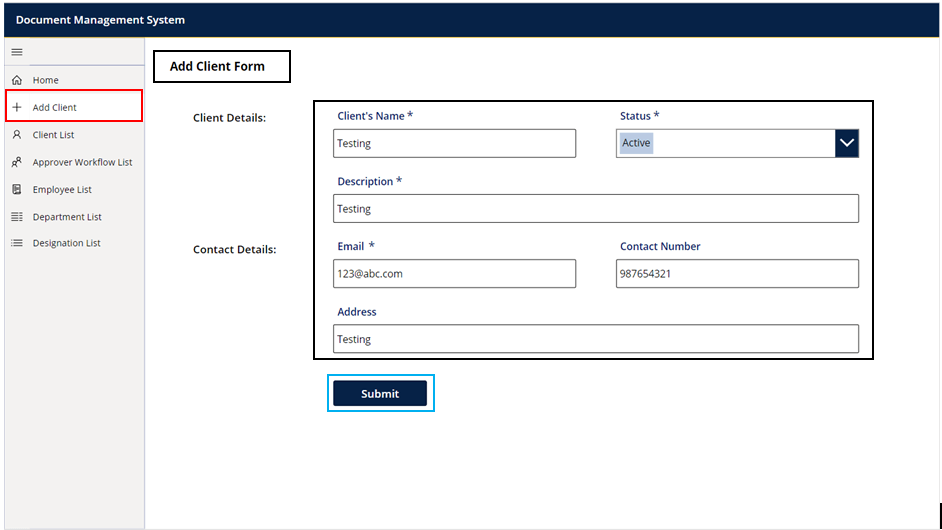
Upon successful completion, the system will display a ‘Success Screen’ and automatically redirect to the ‘Client List Screen.’ This feature ensures a seamless experience for the user and allows for quick and easy navigation between different screens.
C) To view all the saved clients:
- Next is ‘Client List’ screen.
- The Client List screen grants access to all newly and previously created clients, providing a convenient and organized way for the admin to view their data.
Every important field is visible directly on the screen along with two icons, Edit [Orange Box] & Delete [Green Box].
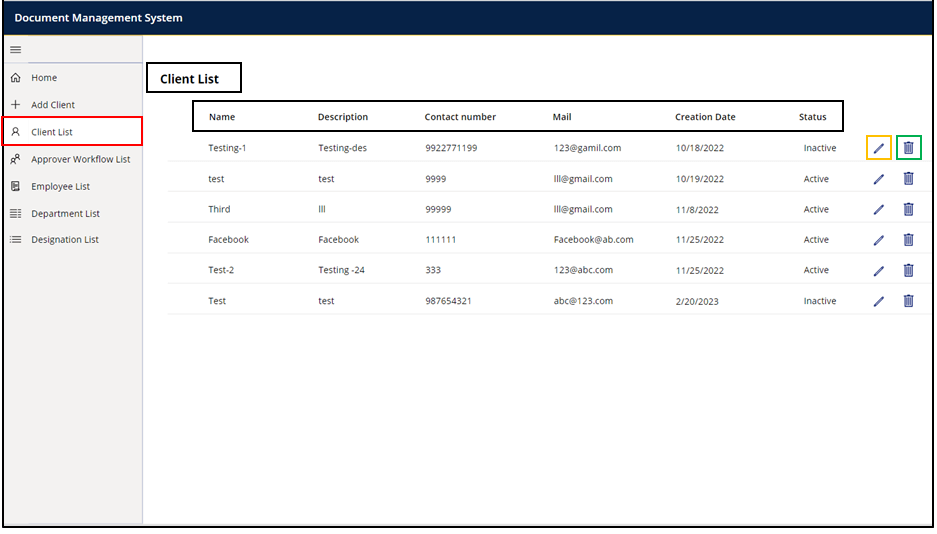
- To Delete a record:
The Delete option will remove the record from the database.
- To Edit a record:
After clicking on the Edit option, a new form will appear. This form will have all the fields pre-filled with the data of the selected record. By selecting the Submit option after editing the desired field, the admin can efficiently save the changes. By ensuring a straightforward process, the desired data can be updated quickly and accurately, providing a seamless experience for the admin.
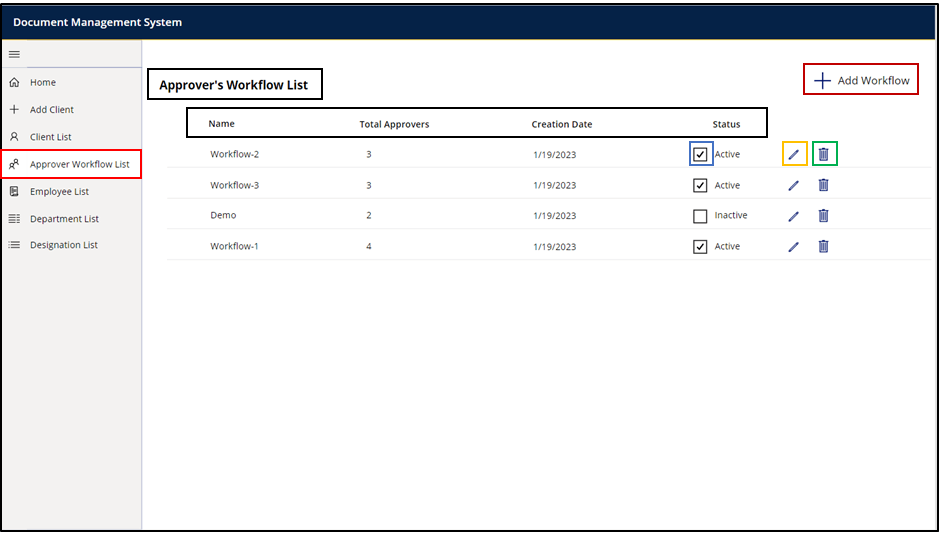
D) To view the list of all ‘Approver Workflow List
Next option is ‘Approver Workflow List’ which shows a screen with all the created Approver Workflows in a gallery.
We displayed the four fields in a proper and informative list
These records also have the option to Delete [Green Box] or Edit [Orange Box] the Number of approvers to it.
There is a checkbox on the left of Status [Blue Box] to directly make the Workflow Active or Inactive. Just like clients, only the Active workflows will be visible for the employees to select and use as their workflow.
Note: Only the workflows which aren’t in use by any Employees as their active workflows can be deleted or edited.
- To view the list of added approvers:
There is an additional option available to view the names and order of the approvers. When clicked on the Total Approver option [Dark Red Box], a list will appear which will show the Names and order of the Approvers [Dark Green Box] as shown below:
![8. Names and order of the Approvers [Dark Green Box] as shown below](https://www.intelloger.com/wp-content/uploads/2023/04/8.-Names-and-order-of-the-Approvers-Dark-Green-Box-as-shown-below.png)
- To add a new Approver:
To add a new approver to the existing list,
- Select Edit option & a new form will appear.
- Select Employees based on Department or Designation. There is also an option to select the Department Head [Green Box] when the desired Department is selected.
- Click on Add button.
- By selecting the ‘Add’ button, the Employee’s name can be submitted to the database, and the selected employee will be added to the Workflow.
![9. select the Department Head [Green Box] when the desired Department is selected.](https://www.intelloger.com/wp-content/uploads/2023/04/9.-select-the-Department-Head-Green-Box-when-the-desired-Department-is-selected..png)
- To add a new workflow:
- To add an entirely new Workflow to the system, the ‘Add Workflow’ option on the top right should be selected [Orange Box].
- A new screen with the form will appear as shown below:
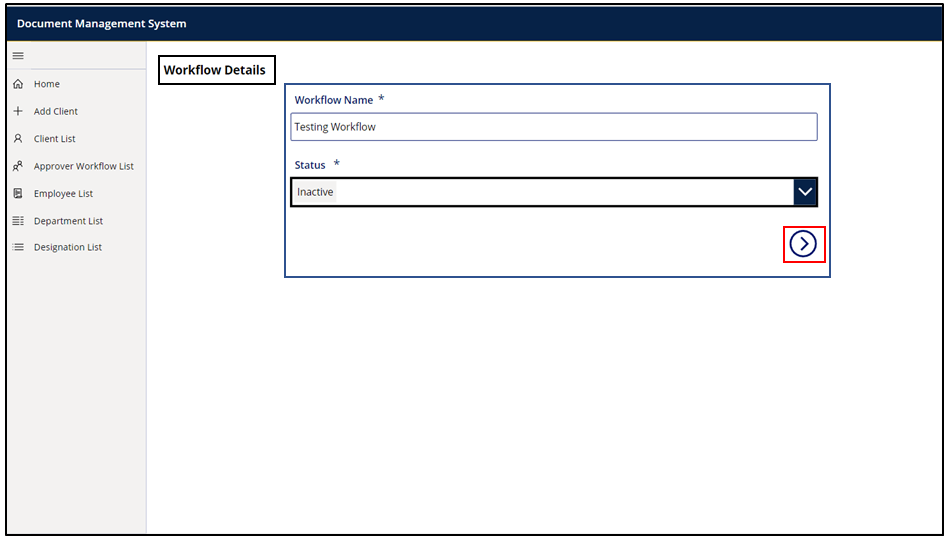
- After filling up Workflow Name & Status, the Next Icon [Red Box] is to be selected to move to next screen.
- Initially empty since no approver has been added to the workflow yet, the Approver List screen will be displayed.
- To add an approver, the Add Approver option [Red Box] on the top right corner is to be selected as shown:
- Select an approver by Department or Designation. In this example we’re using Designation as shown:
![12. Add Approver option [Red Box] on the top right corner is to be selected.](https://www.intelloger.com/wp-content/uploads/2023/04/12.-Add-Approver-option-Red-Box-on-the-top-right-corner-is-to-be-selected..png)
- Select Add button to insert approver. After adding the approver, the list will look like this:
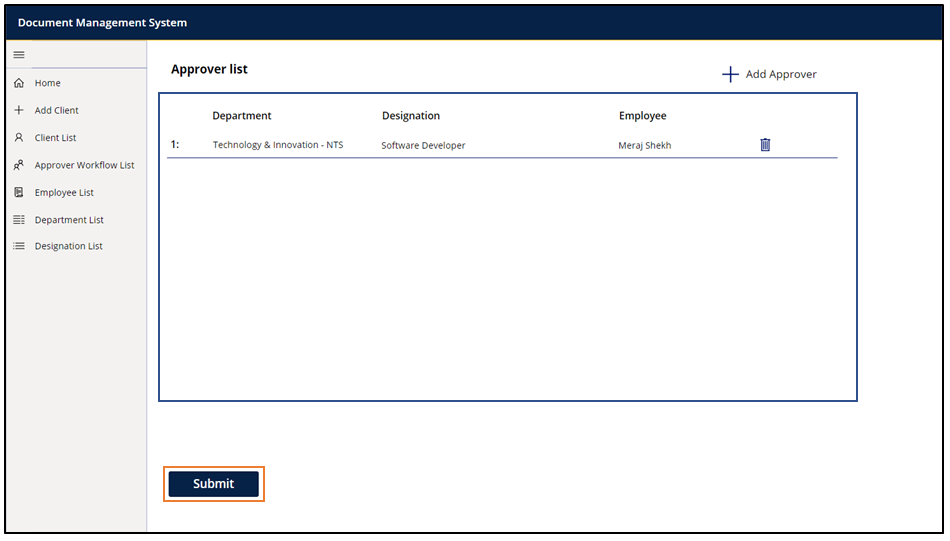
- After the selection is made, the submit button will appear. Simply click on the submit button to complete the process.
After completing the above steps, the Admin can submit the workflow to the database. After submission, a success screen will emerge, redirecting the user to the ‘Approver Workflow List’ screen, where the admin can locate the recently created Workflow, as illustrated below:

E) Managing the Employee details:
Next option is ‘Employee List’. Here, all the information about all the employees is listed, and an option to sync the employees manually from the Office365 users is provided. The screen looks like as shown below:
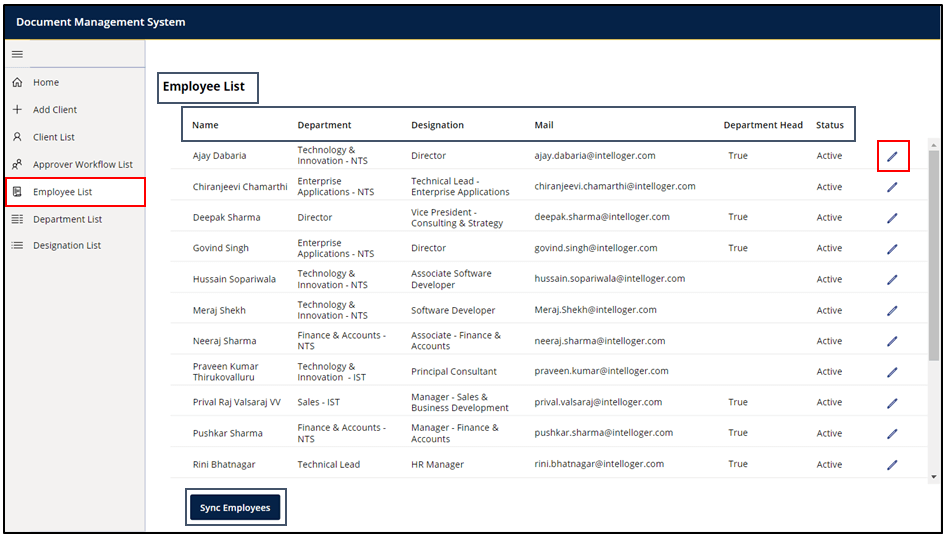
- To Edit the Employees’ details:
- Select Edit option [Red Box]
- The edit form will appear as shown:
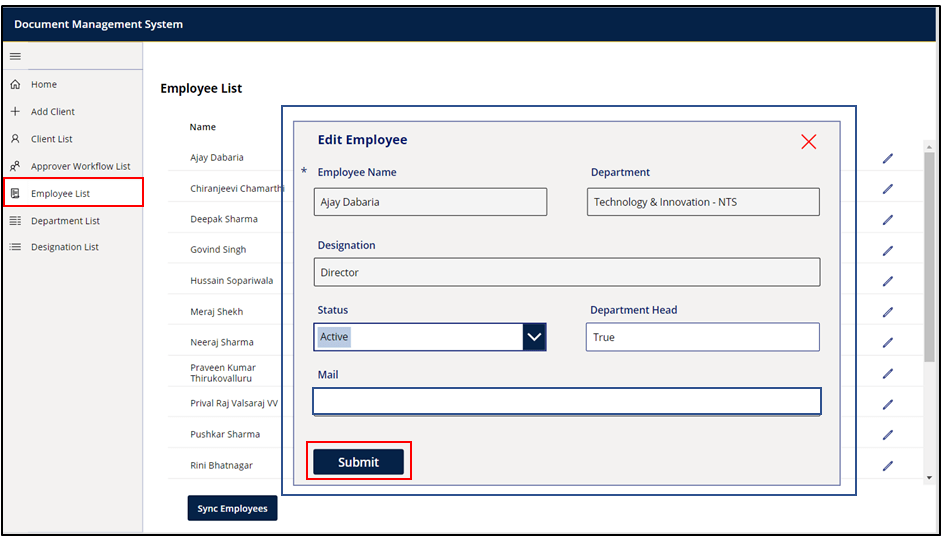
- Make the changes as needed.
- Select submit [Red box] to save the changes
F) Managing Department Details:
Next Option is ‘Department List’. Here the names of Departments will appear along with the option to Delete/Edit the existing one or to create a new one as shown below:
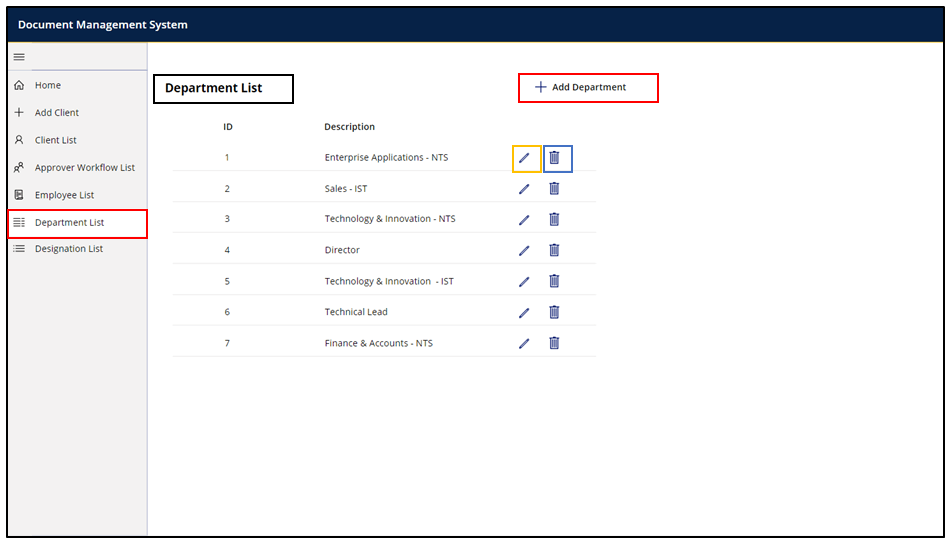
- To edit the department:
- Select Edit option [Orange Box].
- The editing form will appear with the pre-filled name of the selected department as shown:
![18. when edit option [Orange Box] is selected, a form will appear with pre-filled name](https://www.intelloger.com/wp-content/uploads/2023/04/18.-when-edit-option-Orange-Box-is-selected-a-form-will-appear-with-pre-filled-name.png)
- Select Submit [Red box] to save the changes.
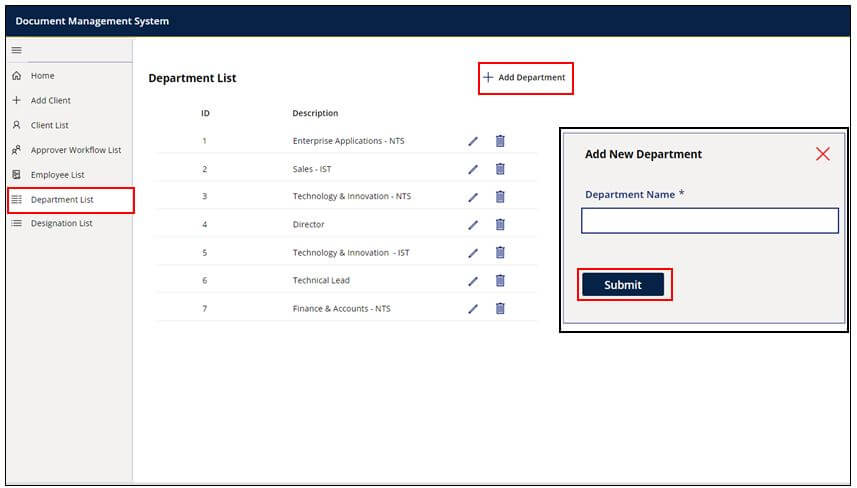
- To create a new department:
- Select ‘Add Department’ option. [Red box]
- A blank form will appear.
- Enter the Department Name and click submit to save the data.
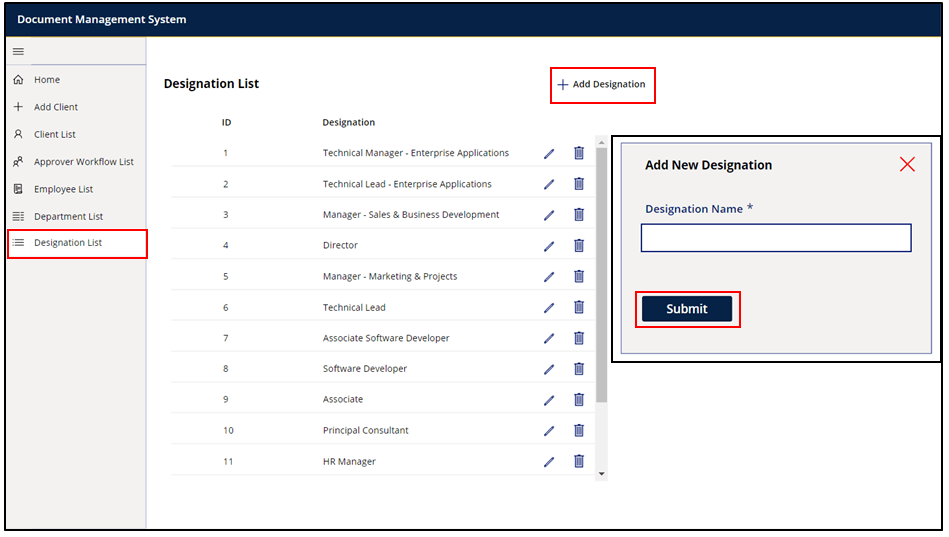
G) Managing Designation Details:
The final option is ‘Designation List’. Here the names of Designations will appear along with the option to Delete/Edit the existing one or to create a new one as shown below:
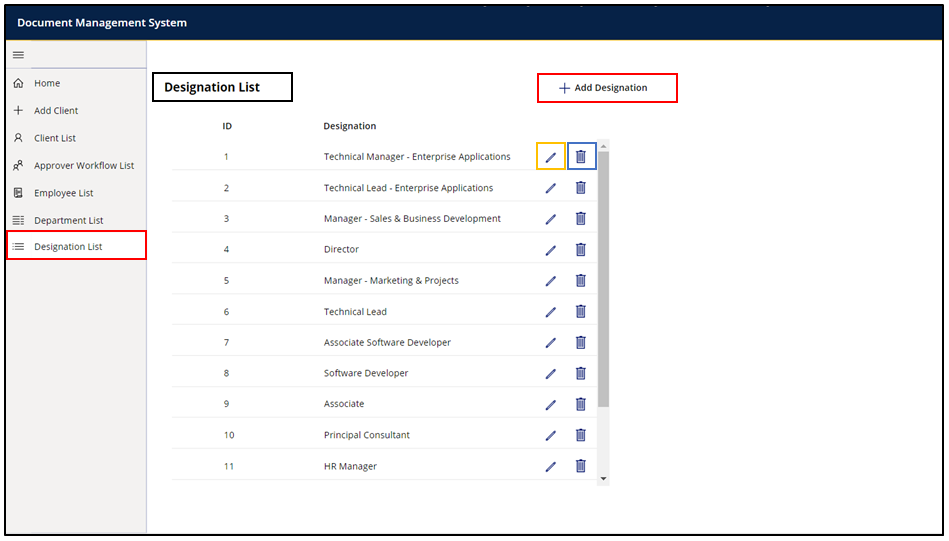
- To Edit Designation:
- Select Edit option [Orange Box].
- The editing form will appear with the pre-filled name of the selected Designation as shown:
![21. [Orange Box] is selected, a form will appear with pre-filled name of selected designation](https://www.intelloger.com/wp-content/uploads/2023/03/21.-Orange-Box-is-selected-a-form-will-appear-with-pre-filled-name-of-selected-designation.png)
- Click on Submit [Red box] to save changes.
- To create a new designation:
- Select ‘Add Designation’ option.
- A blank form will appear.
- Enter designation name.
- Click on submit [Red box] to save the data as shown:
6.2 Employee Workflow
Let’s explore how the app functions when the logged-in user is an Employee.
When logged in as an Employee, the application’s features and functionality are designed to streamline the document submission and approval process, making it simple and efficient for all those involved.
When the user logs in, ‘Home’ will be pre-selected by default.
A) To view the details of a particular field:
The Dashboard is fully interactive, and data updates automatically when an Employee selects an informative field. This feature provides quick access to up-to-date information, enabling timely decision-making and action-taking:
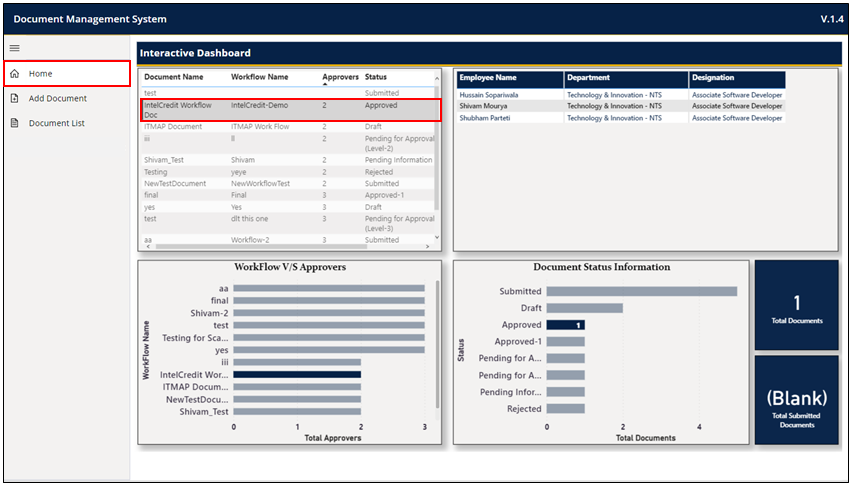
Upon choosing the ‘IntelCredit Workflow Doc’ field, all other fields exhibited the corresponding data accordingly.
B) Next option is ‘Add Document’
1. Select the ‘Add Document’ option just below the ‘Home’ as shown below:
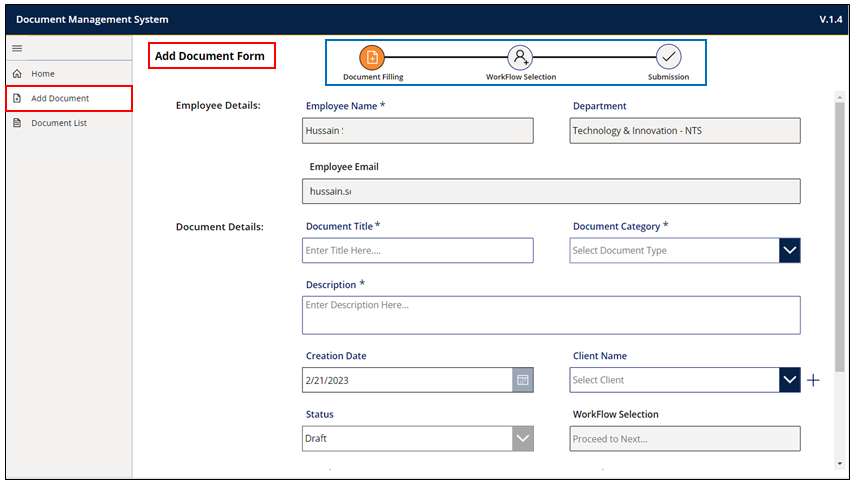
- Fill up the details.
- Click on Next to proceed to workflow.
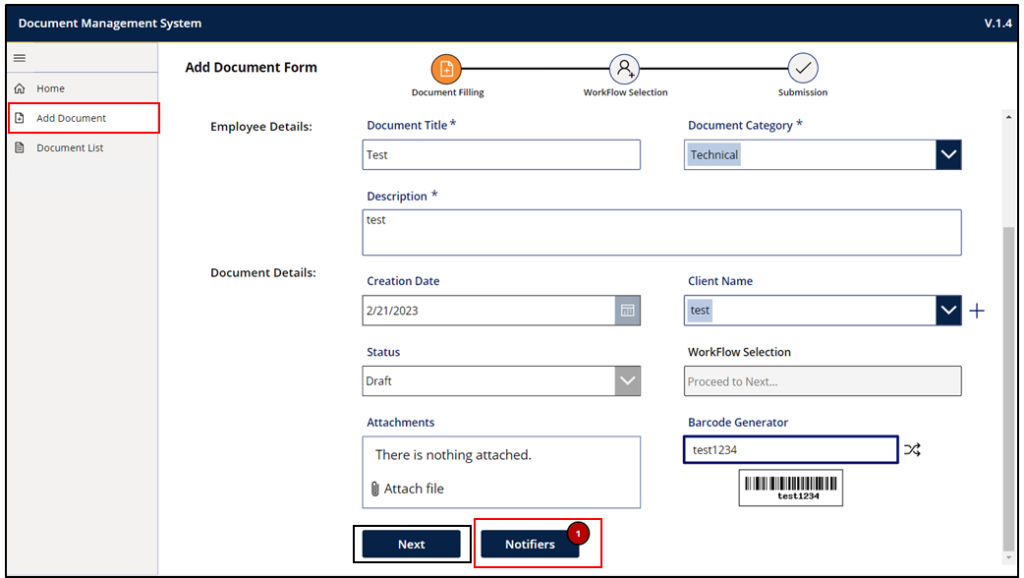
In the Add Document, we have several features. Some of them are:
- Auto filling of Name, Department & Mail.
- A progress bar which changes colour according to the page you’re on. [Blue Box]
- The Barcode generator can be automatically or manually created. [Dark Blue Box]
- Button to add the Notifiers. [Green Box]
![26. Button to add the Notifiers. [Green Box]](https://www.intelloger.com/wp-content/uploads/2023/04/26.-Button-to-add-the-Notifiers.-Green-Box.png)
Barcode: This app includes a unique feature where a barcode is generated for each document, allowing for easy tracking and identification. Moreover, the application comprises a barcode scanner that, when utilized to scan the unique barcode, will redirect the user to the corresponding document.
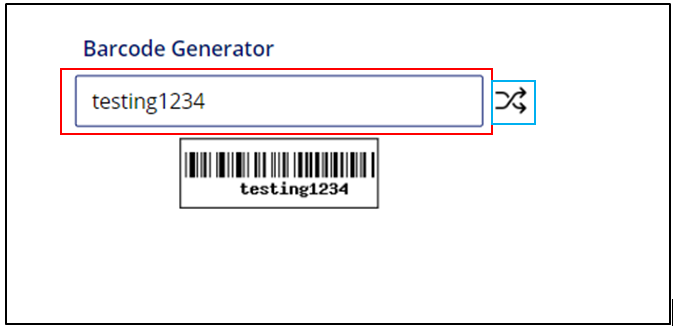
This barcode generator has 2 options, user can either enter their unique barcode manually and the available system will save it with the document.
There is also an option to create a random 8-digit alpha-numeric barcode [Blue Box].
- Notifiers:
Notifiers: Individuals who are added to the document as observers can monitor the entire approval process, but they are not authorized to participate. They can only view the document and will receive email notifications at each stage.
- Adding Notifiers:
- Select Notifier button. When clicked, the following screen will appear:
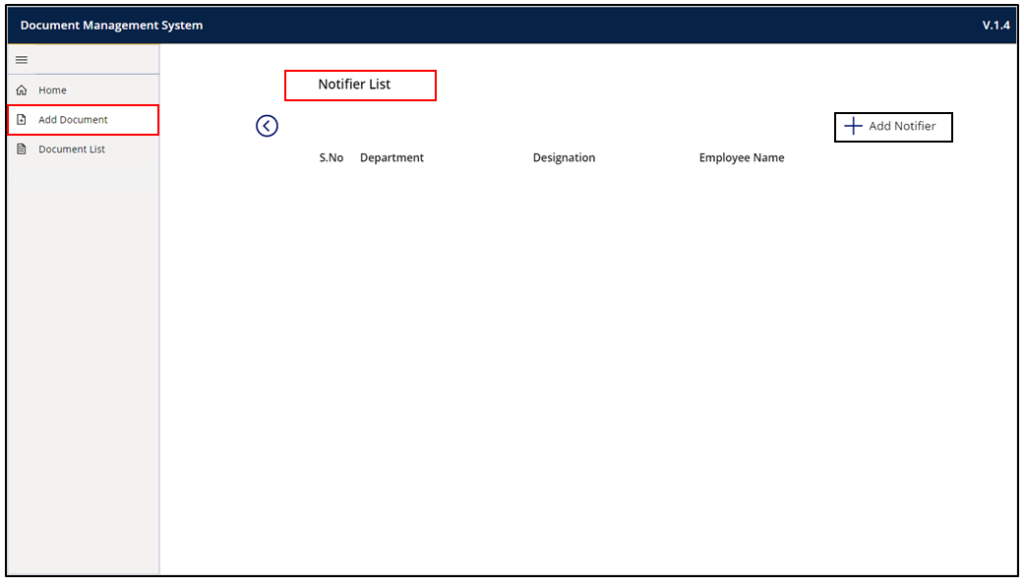
- An empty list will appear.
- Select ‘Add Notifier’ [Black Box].
- A form will appear as shown:
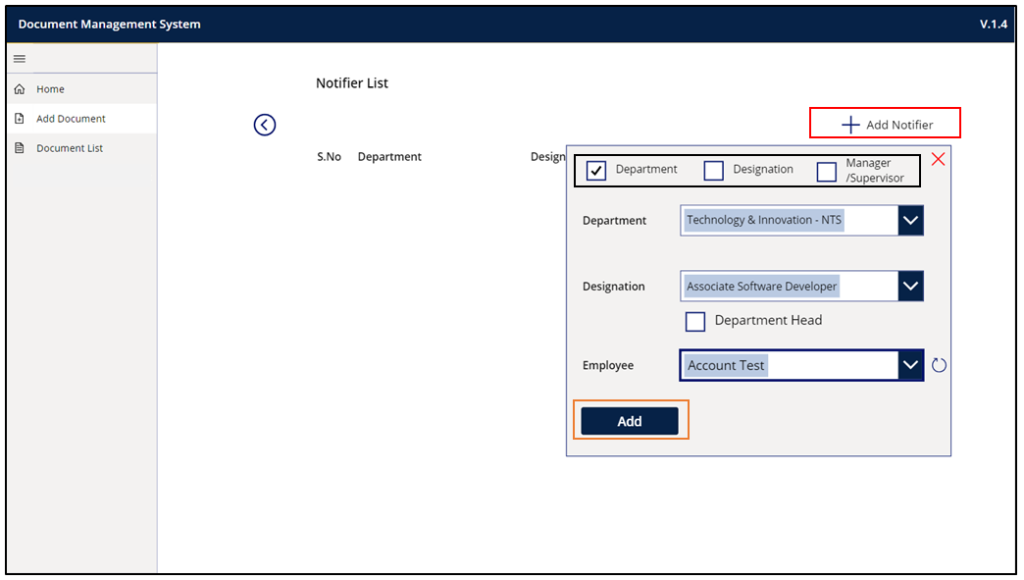
- Select an employee by Department , Designation or current manager/supervisor.
- Click on Add button [Red box] to save the data.
- The employee will be added to the list as shown:
![30. Add button [Orange Box] and the Employee will be added](https://www.intelloger.com/wp-content/uploads/2023/04/30.-Add-button-Orange-Box-and-the-Employee-will-be-added-1024x585.png)
The list has delete option as well to remove the Notifier.
After adding the notifiers, the back button will redirect user to the document information filling screen [Yellow Box].
Special: When a notifier has been added, the Notifier button will show a small notification indicating the number of notifiers that have been added to the list as shown below:
Adding workflow:
- After filling up the document details & selecting the notifiers, next step is to select the approval workflow. To proceed, the [Black Box] next button must be selected.
- Once the workflow selection screen emerges, the progress bar at the top will also alter, as depicted below:

- When selecting the workflow type, there are two options available:
- Pre-defined Workflow [Black Box]
- Custom Workflow [Blue Box]
- Creating Pre-defined Workflow:
When a user selects Pre-defined, the following things will be visible:
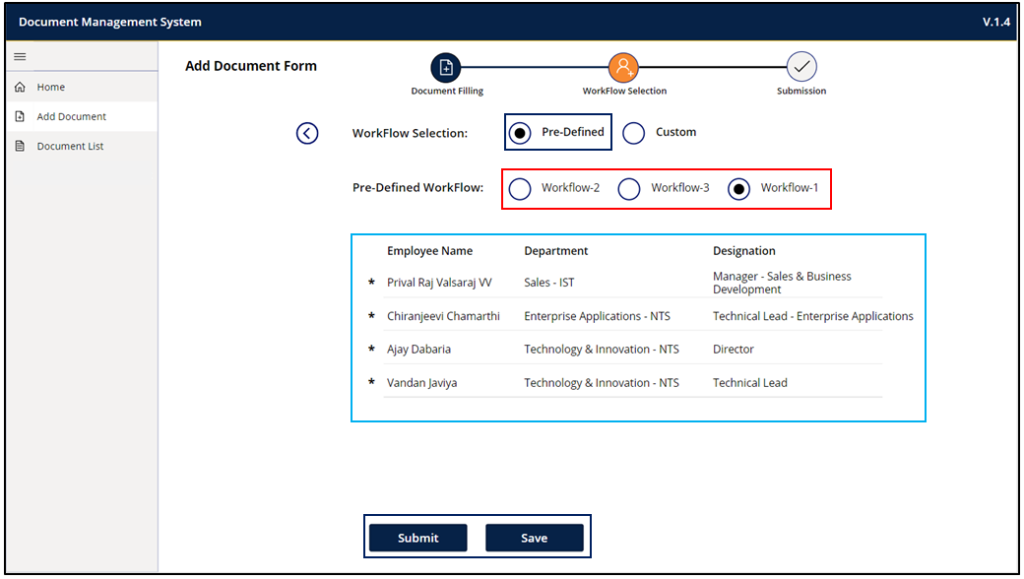
- the list of all the workflows created by Admin will appear below the workflow types [Red Box].
- When one of the workflows is selected, the list of all the users included in that selected workflow will appear below the workflow names [Blue Box].
- For users to either preserve the document as a draft or submit it for approval, the “Save & Submit” button will materialize.
The submission will trigger the Power Automate and all the Notifiers and First approver will receive the respective mail and rights.
III. Creating Custom Workflow:
If a user chooses “Custom”, the subsequent items will become visible:
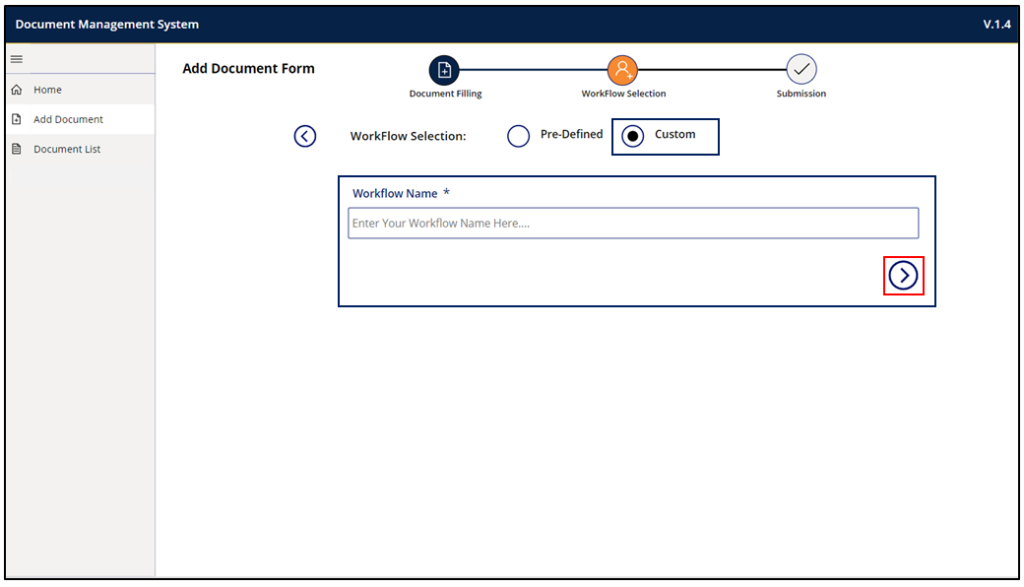
- A form is provided to fill in the Name of the custom workflow and the Next icon. The workflow name must be unique; otherwise, an error message will appear stating that the workflow name is already taken.
- Clicking on the next icon will bring up the ‘Add Approver’ list, as shown below:
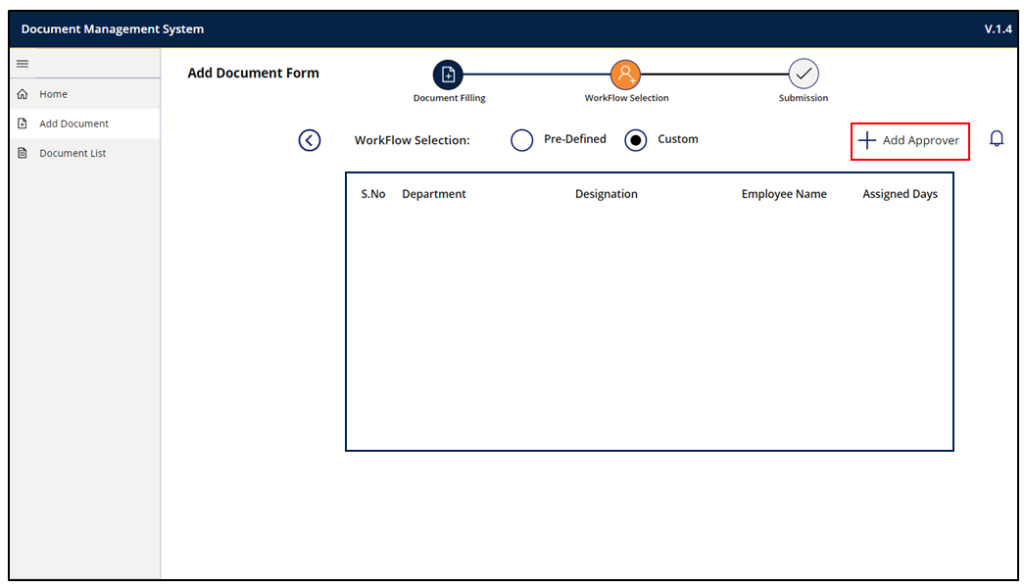
- An Empty list will appear.
- To include an approver in the list [Red Box], simply select the “Add Approver” option. Upon clicking, the form for adding an approver will emerge, as presented below:

- The form has the same options as used in Add Notifier. The additional field is ‘Approval Due Days’ [Black Box].
Approval Due Days: it is the time limit allotted for approvers to take action on a document. If the time limit is exceeded, the document will be automatically approved and forwarded to the next approver (if applicable).
When it comes to pre-defined workflows, each approver will have a limit of two days. However, in custom workflows, the user can set their own limit, as illustrated above.
- Once the approver has been selected, the Add button is used to add them to the list, which will then appear as shown below:
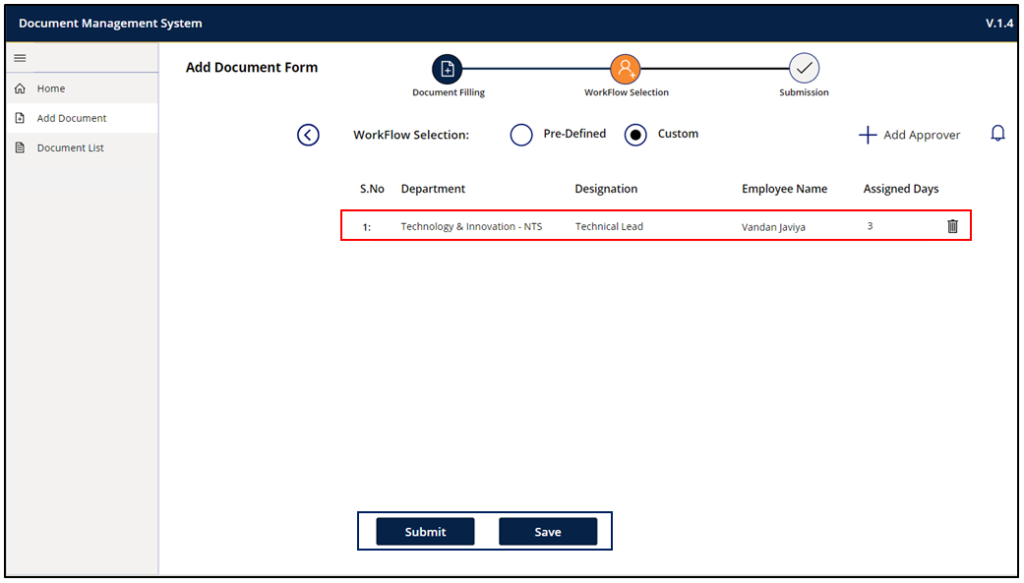
- Upon adding an approver, the Save and Submit button will appear at the bottom of the screen.
- The submission will trigger the Power Automate and all the Notifiers and First approver will receive the respective mail and rights.
- When the submission is successful, a success screen will appear and the user will be directed to the Document List after a two-second delay.
C) Managing the Document List:
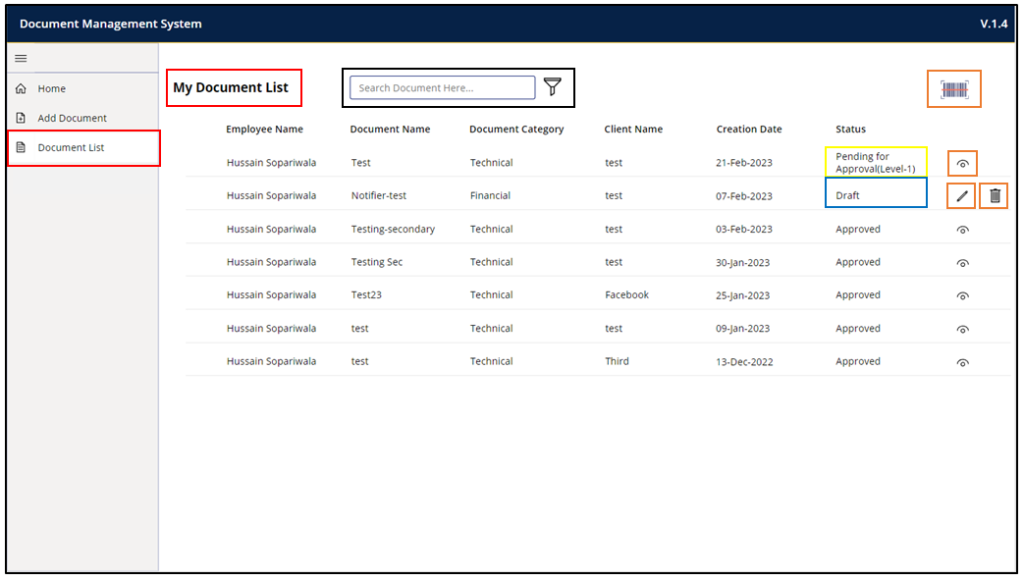
The document list has the following features:
- Filter option to filter the document list [Black Box]
- Barcode Scanner in top right [Red Box]
- The “View Document” icon will only be accessible if the document status is anything other than “Draft”.
- Edit & Delete icon if the status of the document is ‘Draft’.
- Hovering on the status will show the tooltip with the names of all the Approvers and their status.
Upon clicking on the filter icon, the Filter Pane will appear, as illustrated below:
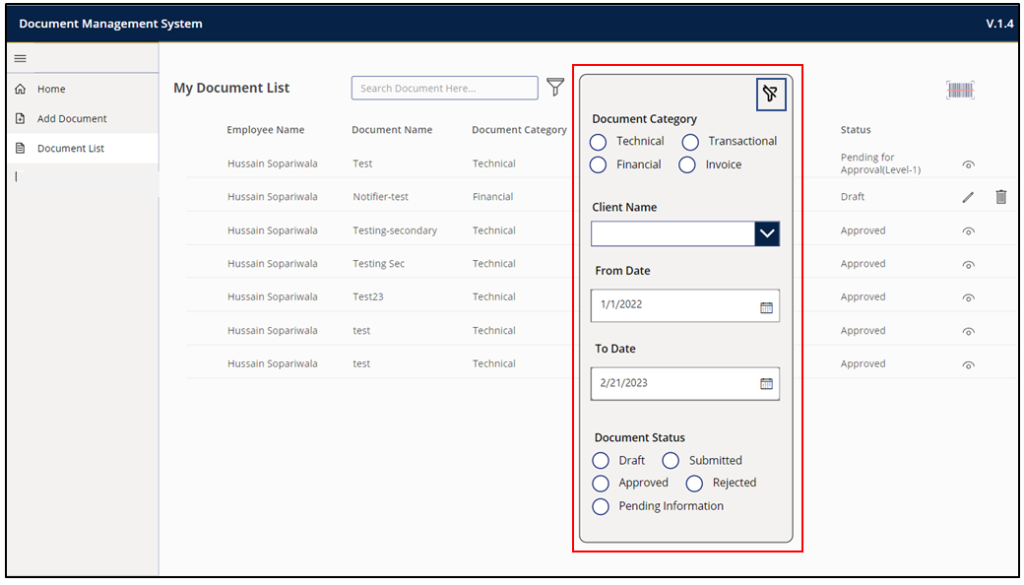
There is also an option for Clear All filters on the top right of the filter pane [Black Box].
- To view a particular document:
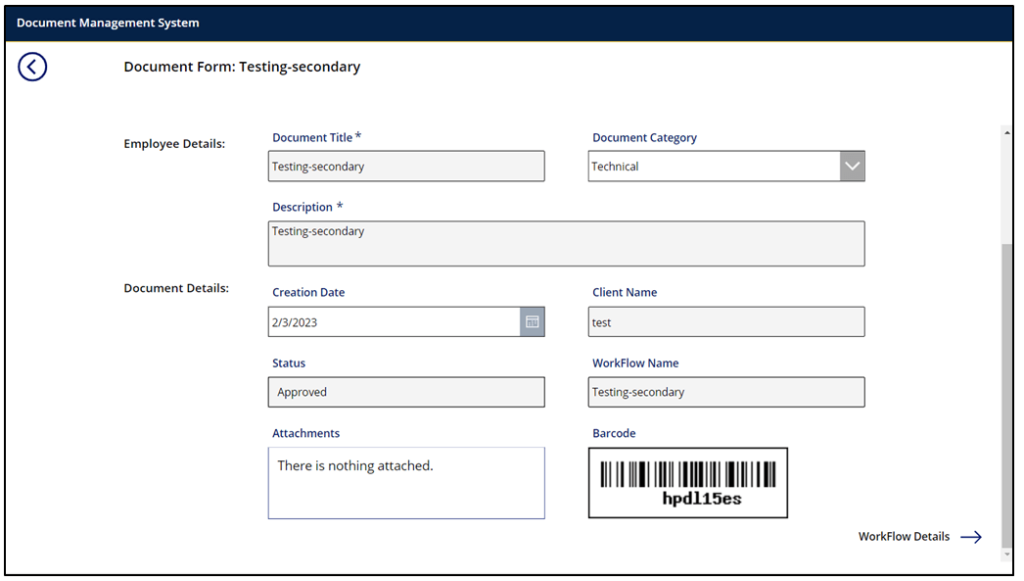
Clicking on the view icon will redirect the user to the view screen, as illustrated below:
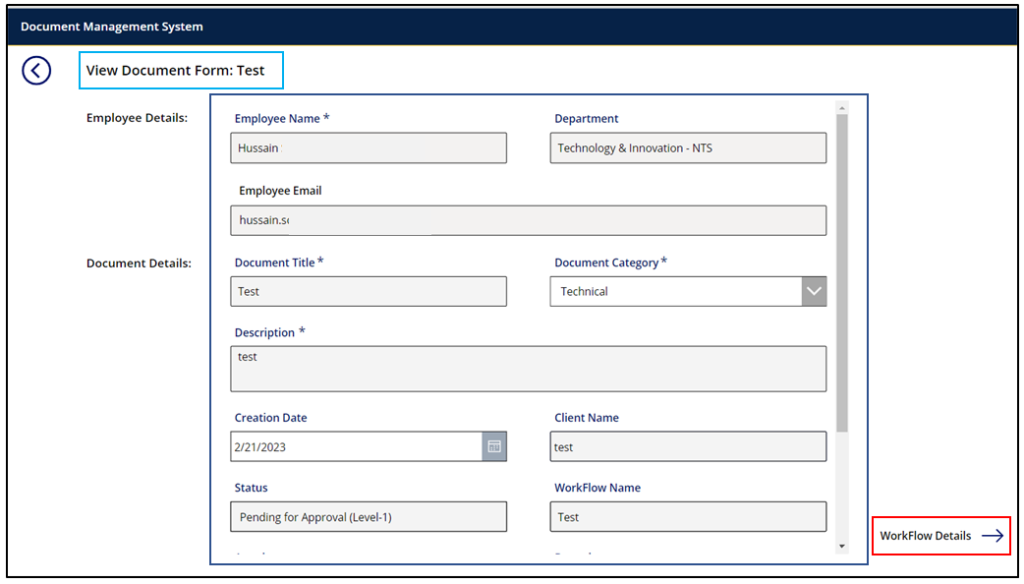
The view document screen has several features:
- The fields will be in View Mode, meaning that the submitted data cannot be altered. [Black Box]
- View Document Form has the name of the document right to it for better visual understanding. [Light Blue Box]
- Workflow Tracking feature to track the status of the document. To do that Workflow Details option is available in the bottom right of the screen [Red Box].
- To view the workflow:
Selecting ‘Workflow Details’ will direct the user to the workflow tracking page, as demonstrated below
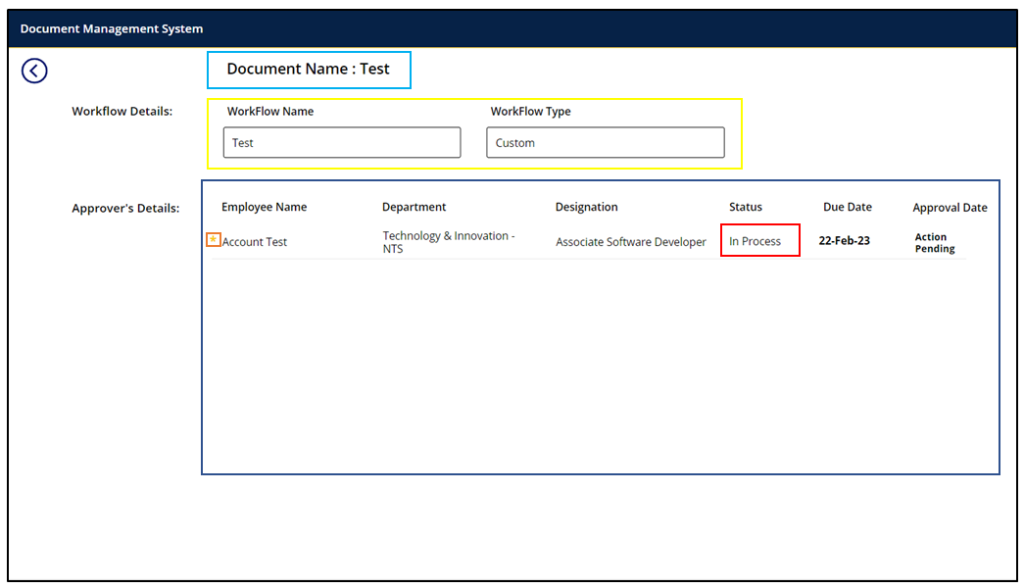
- This screen will have several informative fields like Approver’s name, current status, due date, approval date etc.
- On the top, the document name will appear for better understanding.
- A few workflow details as well [Yellow Box]
- An orange star to the left of the employee’s name [Orange Box] will indicate that currently, the document is to this employee.
In the case of a Draft document, the fields which are in the non-editable mode will be available for editing and the user can edit and submit the document.
The top ‘Edit Document Form’ will confirm that the mode for the document is Edit.
After editing, the user can submit the form using the submit button [Red Box].
As for the approver workflow, user can select Workflow Details [Green Box] & system will navigate user to workflow tracking screen where user can add or remove a specific user while the document is in the DRAFT state.
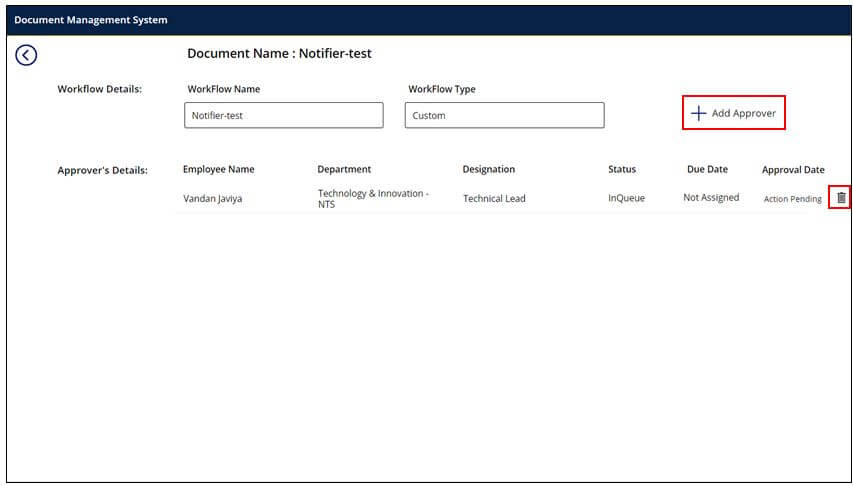
Here the Add Approver and Delete options for the Approvers will be visible. And the status of every approver will be ‘InQueue’. The addition of approvers is similar everywhere to maintain consistency.
6.3 Manager Workflow
Let’s explore how the app functions when the logged-in user is a Manager.
As a Manager logging into the app, the features and functionality are customized to simplify the document approval process. Apart from the features accessible to Employees, Managers can view an ‘Employee Document List’ in the menu and track the real-time workflow status of documents. Let’s take a closer look at how the app works for this user role:
- Managing Employee’s document list:
As a manager, you have access to all the features available to employees, plus an additional option in the left menu called ‘Employee Document List’.
This feature allows you to see a list of all documents in which you have been selected as the approver or notifier. Through clicking on any document listed, you can readily view its status, along with any comments or notes appended by employees or other managers.
Note: Only those with a ‘Pending for Approval’ status for logged-in users will be visible. Any documents with an ‘InQueue’ status will not appear in the list.
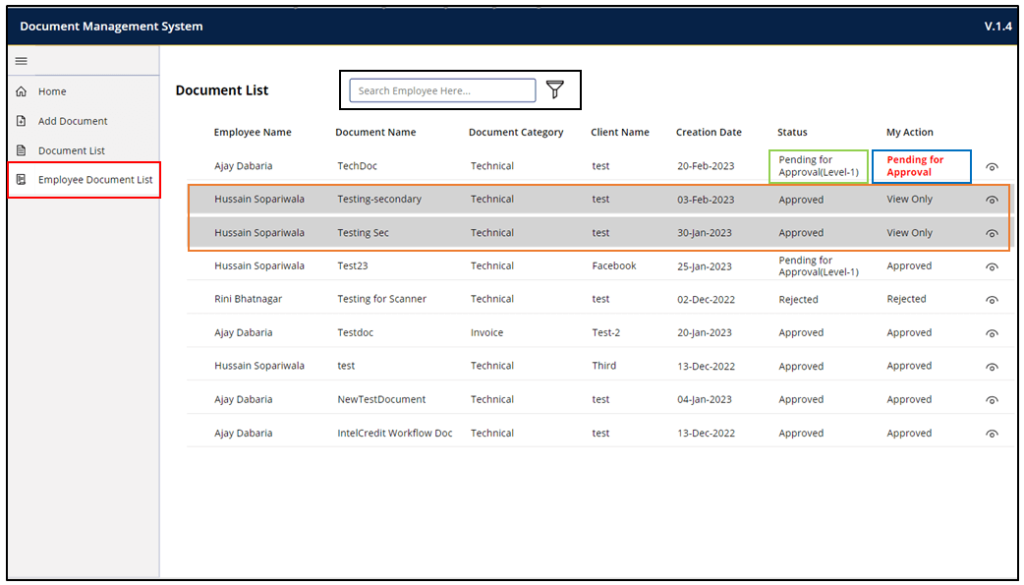
- There are many features of this screen as:
- The ‘InQueue’ documents won’t be visible.
- The Status of the document and My Action is separate to eliminate confusion [Green and Blue Box Respectively].
- The record’s background colour will appear in dark grey if the Manager is selected as a Notifier and not as an Approver [Orange Box].
- Hovering on Status [Green Box] will show the Approver list with their status.
- Hovering on the My Action [Blue Box] will show the Due Date if it is in ‘Pending for Approval’.
- Filter option to filter the employee document list [Black Box].
Additionally, clicking on the filter icon will open up a filter pane, as demonstrated below:
A reset-all icon is also available to clear all applied filters [Black Box].
While selecting the view icon of a particular record, the system will navigate the user to a new screen as shown below:
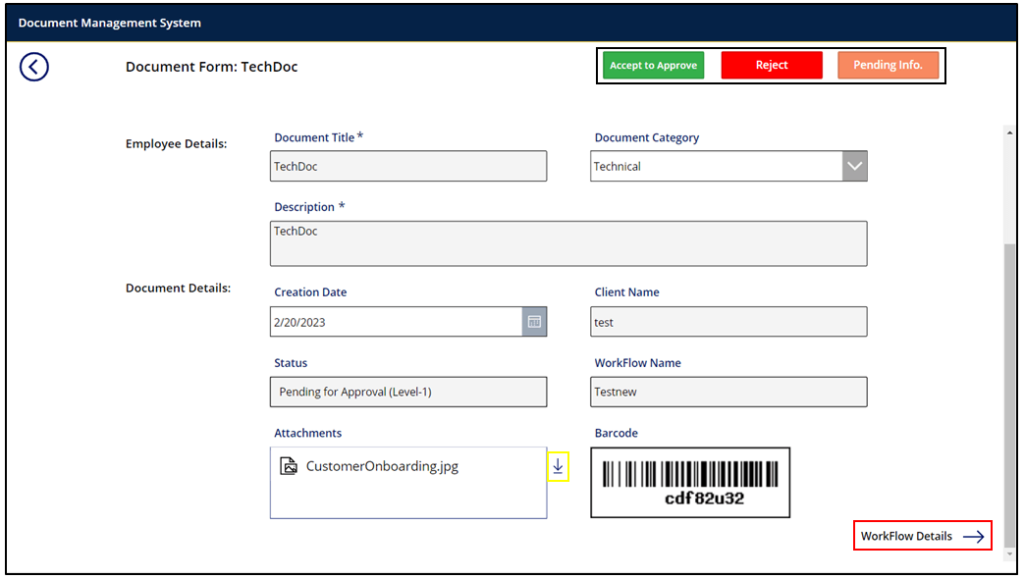
In this screen, everything is in the View Mode.
The manager can download and view the attachment [Yellow Box] as well as proceed to track the workflow [Red Box].
- To change the Status of the document:
At the top right corner of the screen, three options are presented for the logged-in manager: ‘Approve’, ‘Reject’, and ‘Pending Information’ [Black Box]. These options allow the manager to quickly and easily take action on the document based on their approval status, streamlining the document management process.
- To Approve a document:
Click on Accept to approve button.
- When user selects approve, 3 emails will be triggered by Power Automate:
- Submitter notified on submission.
- Next approver notified for approval. (if any)
- Notifiers informed on document status.(if any)
After sending the emails, the user will be navigated to the ‘Employee Document List’ page by the system.
- To Reject a document:
- Click on Reject button.
- When the user selects Reject, a new pop-up will appear as shown below:

- Here the comment is mandatory. Only after comment can user reject the document.
- After commenting, select Reject button to reject the document.
Rejecting will trigger only mail to submitter and notifier.
The system will navigate the user to the ‘Employee Document List’ page after sending the emails.
- To ask for pending information:
- Click on Pending Info. button.
- When the user selects ‘Pending Information,’ a new pop-up will appear, as shown below:
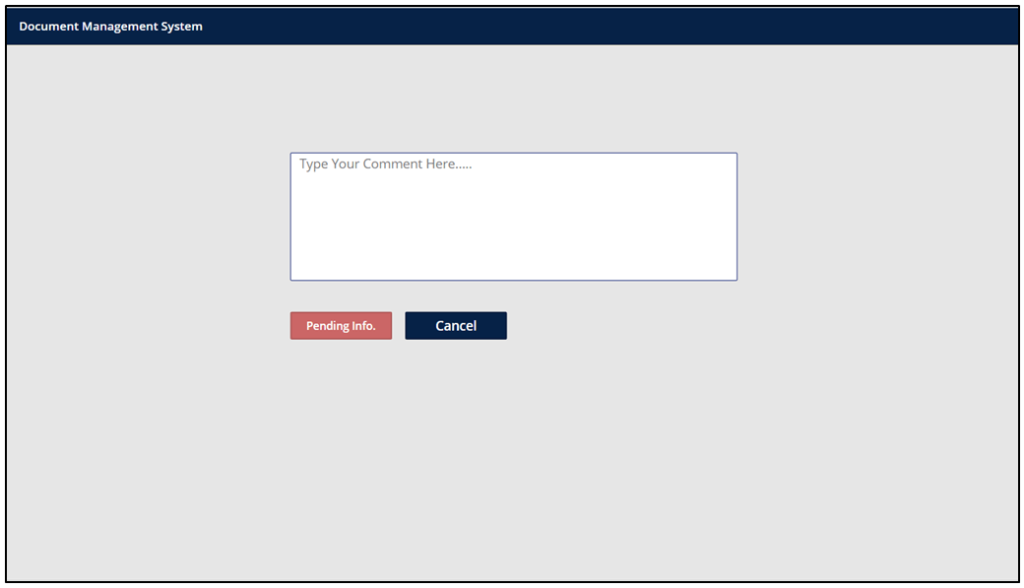
- Comments are required before proceeding with the document in the app
- After commenting, select Pending Info to save the changes.
This will trigger only mail to the submitter and notifiers. The submitter can read the comment, make the changes and can resubmit the document.
After sending the emails, the user will be navigated to the ‘Employee Document List’ page by the system.
- Security for notifiers:
In the case of Notifiers, the options won’t be available as shown:
Summary:
As a manager, you can experience seamless document management with the app, enabling you to effortlessly approve or reject documents assigned to you, all while keeping track of the progress of each submission through workflow tracking. With the additional feature of the Employee Document List, you can quickly access all documents in which you are selected as the approver or notifier, ensuring efficient and effective management of the approval process.
7. Conclusion
The Document Approval System developed on the Power Platform offers an efficient and streamlined document management solution that’s both centralized and secure. Furthermore, with its document submission feature, workflow tracking, and role-based access, the app simplifies the document management process, reducing the burden on both employees and managers. Additionally, the app’s user-friendly interface and intuitive design make it easy for all users to navigate and complete their tasks efficiently.
The Power Platform technology provides numerous advantages to the app, including low-code development, rapid deployment, and scalability, making it a cost-effective and efficient solution that businesses can rely on. Additionally, the app utilizes Microsoft’s cloud services for enhanced security and reliability, ensuring that the documents are always secure and accessible.
Its use cases demonstrate its versatility and ability to adapt to various business needs, such as HR management, contract management, and invoice processing. In addition, the app’s role-based access ensures that only authorized personnel can access and manage the documents, thereby ensuring the security and confidentiality of the data.
Overall, the ‘Document Approval System’ developed on the Power Platform provides a robust solution for businesses seeking to enhance their document management process, increase efficiency, and maintain data security. Therefore, its advanced features, user-friendly interface, and versatile use cases make the app a valuable asset for any organization.
Read Related Blogs below: